Sunday, January 30, 2011

Best Pineapple Tarts

After my first attempt on pineapple tarts, I stumbled into Anne's blogpost on her pineapple tarts which referred me to Wendy's blog on her "Best Melt-In-Your-Mouth" Pineapple Tarts. With her very detailed 'documentation', pictures, instructions and the rave reviews, I've decided to give pineapple tarts another try. Of course, hubby thought that I must be out of my mind. We've already 3 types of pineapple tarts!

The 3 pineapple tarts we have: (from left) made by mum, bought by mum-in-law& my first attempt.

Nevertheless,  I went on to buy another 2 big pineapples!


And made more pineapple jam... I actually halved the amount of sugar as we didn't like the pineapple jam too sweet. I just hope that the mould will stay away until we've finish eating the tarts.  According to Wendy, the sugar also acts as a preservative. I've also used cinnamon powder instead of a cinnamon stick.

Next, I made the dough and followed her recipe closely. The dough was really soft as compared to the dough from my first attempt. The additional ingredients of cream and creamed cheese made the dough really soft. I wonder how this is going to wrap up the pineapple jam. I let the dough rest in the refrigerator for 30 mins.

While I rolled the cooled pineapple jam into balls....


 This time, I doubled the amount of dough used. Double the amount of dough as compared to the pineapple jam.

Hubby took a bite and proclaimed that this is the best pineapple tarts he had eaten- better than the ones bought by his mum and better than the ones baked by my mum!  All of hard work paid off :) He said I can sell them. But I told him it's not worth the effort. I've spent about 6 hours just to make 3 bottles of pineapple tarts. Well, you can say it's much easier to buy. But well, I had fun and I don't think I can buy a bottle of pineapple tarts outside that's this good. :P 

Look at all the fibre in the pineapple jam. I've grated the pineapple by hand. 
Mum-in-law said this is real pineapple :P
(Is there fake pineapple?)

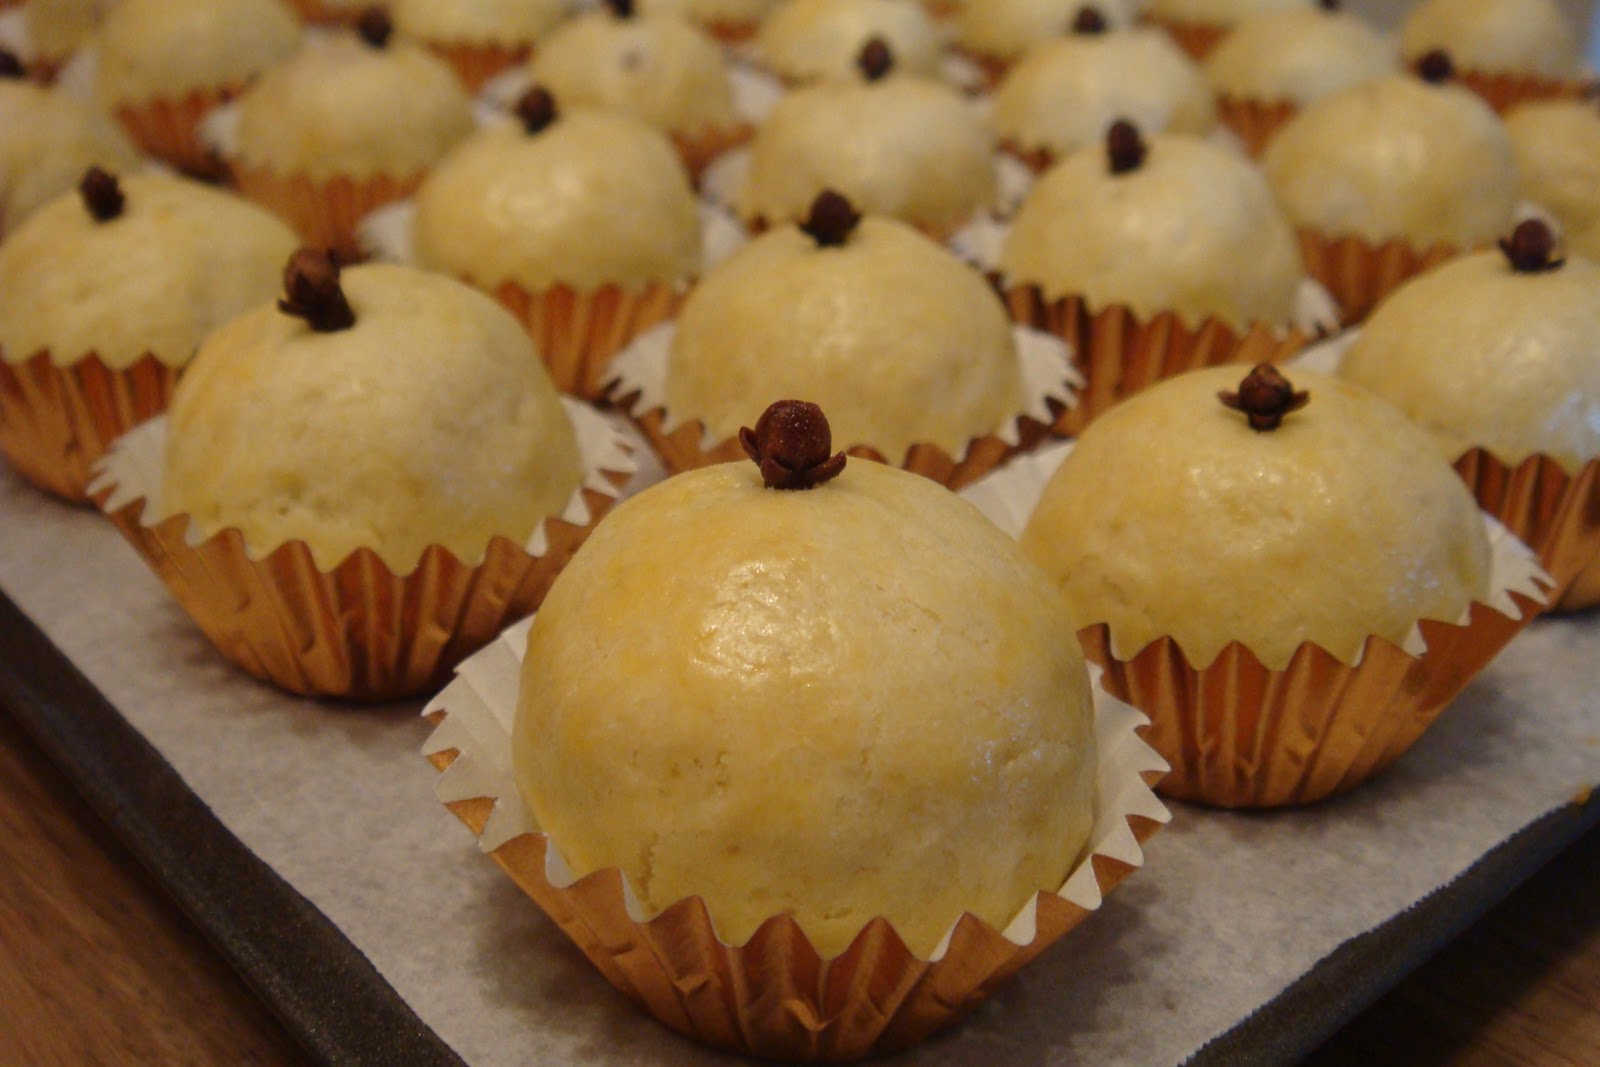
A bottle of pineapple tarts ready for CNY. 
Just hope it'll still be around till then :)

Pineapple Tarts

Mum gave me a bottle of her homemade pineapple tarts, like she always do every year before Chinese New Year...


When we had dinner last Saturday, My mum-in-law also gave me another homemade bottle that she bought.

So now I have 2 large bottles of pineapple tarts that Jerome & I won't be able to finish on our own... not to mention all the other goodies that I've baked and mum has baked!

But being a little crazy & 'passionate' about making my own CNY goodies, I went to buy two pineapples, determined to make my very own pineapple jam so that I can make some pineapple tarts too!  The skin of the pineapple were already cut when I bought them from the supermarket. I just had to cut out the eyes...


And gated them by hand into this pulpy looking mess... As this was my first attempt, I didn't know how this should look like but it's surely too much juice. Keeping my fingers crossed that my pineapple jam will finally appear...


Half an hour later, Hubby looked at my pineapple 'porridge', shook his head and said, "Are you sure this is pineapple jam? I don't think it's going to make it." I'm also starting to doubt it...


 Finally, 2 hours later, my pineapple jam happened!


After cooling it, I rolled the jam into balls using a teaspoon to measure the amount.

 Cloves standing by...

Pineapple tarts before baking...

Baked pineapple tarts. Looked kinda pale as I've added too much water to the egg yolk for the egg wash.


So here it is, my first attempt at pineapple tarts, from scratch! 


As I've used an equal amount of dough to pineapple jam, the crust was quite thin...


 Honestly, I'll have to say the pineapple tarts made by my mum and those bought by my mum-in-law are better than mine, Hey, but this is my first attempt! So I think I've done well :) (Give myself a pat on the shoulders.)

Not going to post the recipe here cos I've found another one much better than this which I'll write about in my next post :)

Wednesday, January 26, 2011

Fried Crab Sticks

Tried frying crab sticks for the first time. Jerome never liked crabstick, so I just fried a packet just for trial. Jerome tried some and couldn't stopped eating them. He said it's the first time he actually like eating crabstick and went on to praise his wife for being smart for frying them :P

This is an easy snack to make for the Chinese New Year season. The fried crab stick is crispy and totally addictive. There's no need for any seasoning as the crabsticks are already 'seasoned'. Be prepared to fry more because they'll most likely be gone before your guests arrive :)


Method:
Unroll crab sticks & tear into strips. 
Deep fry till golden. 
Sieve and cool on kitchen paper before storing in air-tight containers.

Tuesday, January 25, 2011

Rabbit Eggs?

No! Of course rabbits don't lay eggs! These rabbits are made from quail's eggs! My brother-in-law made this dish of little white bunnies for our early reunion dinner. I'm really impressed and am going to try doing some of my own during the Chinese New Year too :) These are really cute!


What you need?
Hard-boil quail eggs
carrot, cut into thin strips for the eyes.

How to make them?
1) Prepare some hard-boil quails eggs.
2) Cut a piece from the egg so that the egg can rest on a flat bottom. 
3) Cut out the shape of the ears using this cut out piece. 
4) Insert the carrots for the eyes.
5) Make a slit in the top of the egg to insert the ears. 

By the way, my brother-in-law mentioned that they took 2 hrs to create them.
So if you're thinking of making them, allow yourself plenty of time :) 

Saturday, January 22, 2011

Almond & Cornflake Rochers

Just made these (non-bake) almond & cornflake rochers this morning. It's really very easy, try it!


Recipe for Cornflake & Almond Rochers
(makes about 80 pieces)

Ingredients:
500g chocolate chips
100g toasted nibbed almonds
100g cornflakes
some melted white chocolate
* Feel free to adjust the amount depending on whether u like more chocolate, almond or cornflake. Just ensure that there's enough chocolate to cover the almonds and cornflakes.

Method:
1) Melt chocolate chips over a pot of simmering water (double boil).
2) Mix in the almond and cornflakes. 
3) Place small spoonfuls of the chocolate mixture onto a greaseproof paper. 
4) Pipe some white chocolate on top. 
5) Chill in the fridge to set. 
6) Transfer chocolates to baking cups if preferred. 

Thursday, January 20, 2011

Stained Glass Cookies

This is a continuation from my pervious post on rabbit butter cookies...

After making a few batches of rabbit cookies, I decided to make some stained glass cookies.

Empty hearts?

Chopped up Fox candy

Fill up the 'emptiness' with something sweet...

Send cookies back to the oven and melt candy at low heat...

Colourful candy-centred heart-shaped butter cookies...

Stained Glass Cookie...

Stained Glass Cookies

Rabbit Butter Cookies

It's been over a year and I'm still looking for the perfect butter cookie and found a new recipe on All Recipes. I want to use my "Rabbit" cookie cutter to make some rabbit butter cookies to welcome the year of the rabbit.

The recipe was meant more for using the cookie press hence the dough turned out to be really soft. When I first tried to roll out the dough and cut out my rabbits, I had an impossible time transferring the cut out dough to the baking tray. The ears of the rabbit couldn't make it and broke off.  So I had to make small balls of dough and flatten each one directly on the baking tray and cut out each dough individually directly on the baking tray. This is a really time consuming process.


Rabbit-shaped butter cookies to welcome the year of the rabbit :)

Although they looked okay, they're still not up to my expectation for the perfect butter cookie. Find that it's kinda hard. Maybe there was something I didn't do right. According to the reviews, the cookies are supposed to be very good! Anyone know what went wrong? I want butter cookies that taste like Danish butter cookies. If you have a good recipe, please share...

Wednesday, January 19, 2011

Almond Cookies

Just baked my first batch of cookies for 2011! It's also my first attempt at Almond Cookies for the Chinese New Year. Within an hour of posting the pictures on my Facebook, I've got 3 requests- the first asked if I was taking orders, the second asked for the price and the third ordered 2 bottles directly :P I'm flattered :)

But I've only made 3 bottles for own and family consumption only. :)

Crunchy Almond Cookies with loads of almond flakes!

A bottle of almond cookies ready for Chinese New Year!

Yes! I finally did it! :)

I find the cookies a bit too sweet. So the next time I bake them, I'm going to reduce the amount of icing sugar used. 

Recipe for White Almond Cookies (Adapted from Yochana's) 
(makes about 80 cookies) 

Ingredients:
170g shortening
80m icing sugar
1/4 tsp salt
200g flour
80g cornflour
100g toasted almond flakes
a little corn oil if dough is too dry

Method:
1) Cream shortening with icing sugar till creamy.
2) Add in plain flour, cornflour, then the roasted almond flakes. 
3) Add in additional corn flour if dough is too dry. 
4) Once dough is easy to handle, chill in fridge for 30 mins.
5) Roll into 1cm thick and use round cutter to cut into rounds.
6) Transfer cookies to baking tray and bake at 180 d.c. for 25 mins. 
7) Cool cookies on cooling rack before storing in an air-tight container. 

Going to attempt pineapple tarts next! 

Feasting in Penang & Hat Yai

This is a long overdue post. Have been lazy & busy with other stuff. :P

My parents, Jerome & I drove up to Penang then to Hat Yai for a few days in December last year. And look at what we ate!

This is perhaps the most famous Penang Laksa stall in  Penang!

Finally the bowl of authentic Penang Laksa that I've been dreaming about for years!
Tasty thick white noodles in a sour & spicy soup base with lots of kamong fish meat. 
The laksa noodles tasted really great, totally different from the ones we usually eat in Singapore.


The softest muah chee we have ever eaten...

This is the muah chee hawker who has a facebook account. 

Seafood at Bukit Tambun...


The real reason why we're here- the giant grouper's head! 

Green Mango Calabu... that's what I call a real appetizer.

Stir-fry lahlah with ginger & spring onion.

The best chilli kangkong we've eaten...

Fried Crabs with Curry Paste

The highlight of the meal- steam grouper's head. This is actually a quarter of the entire fish head.

This is really the star of the dish- the thick fish skin. Well, I still prefer the flesh.

Here's the address if anyone wants to visit the restaurant.

What about some fruits after dinner?

A fruit stall at some dark corner...

 First, pick a stick of fruits...

Then dip it into either the spicy or non-spicy rojak sauce.

The price list...

When you're done, just pay according to the number of sticks you have accumulated.

The next morning, we had dim sum at Chao Quan. Think they have easily over 100 variety of dim sum & dishes. 


A wonderful version of fried carrot cake.

In the afternoon, we made our way to Hat Yai, Thailand.
Uncle Yao brought us out for many meals... 
More chinese than thai...

Fish head steamboat... somewhat like what we have locally.

Fried oyster with eggs on hotplate. This is the dish that still get us talking...
I don't usually eat the oysters as I find them rather fishy but these oysters here were really fresh. 
They're big, fat and juicy! Pardon the oil, this is really a great dish.
Jerome was saying that we can visit next time just to eat this dish!

After all that feasting, we decided to go for something light for breakfast. 
Pork porridge that was surprisingly good :)

Then we decided we should have some Thai food since we're in Thailand...

Fish Otah in a bowl that's really goooood!

Most important- the Tom Yum Goong! 

We went shopping at the local market and tried some of the food from the street vendors.

Sticky Mango Rice.

Thinking of when we can eat visit again...

Related Posts with Thumbnails